Introduction
VirtualHome is a multi-agent platform to simulate activities in a household. Agents are represented as humanoid avatars, which can interact with the environment through high-level instructions.
The environment allows to place agents in house-hold environments, allowing complex interactions with the objects in them, such as such as picking up objects, switching on/off appliances, opening appliances, etc. The simulator is implemented in Unity and can be called through a simple Python API.

You can use VirtualHome to render videos of human activities, or train agents to perform complex tasks. VirtualHome also includes a Knowledge Base, providing instructions to perform a large set of activities.
Installation
To interact with the simulator, simply clone the VirtualHome API repository:
git clone https://github.com/xavierpuigf/virtualhome.git
And download the VirtualHome executable for your platform:
Operating System |
Download Link |
|---|---|
Linux |
|
MacOS |
|
Windows |
After downloading, you should be able to use the simulator. From the VirtualHome API repository, create a communication with the simulation:
# cd into virtualhome repo
from simulation.unity_simulator import comm_unity
YOUR_FILE_NAME = "Your path to the simulator"
comm = unity_simulator.UnityCommunication(file_name=YOUR_FILE_NAME)
The simulator should have opened. Try getting an image of the current environment.
# Start the first environment
comm.reset(0)
# Get an image of the first camera
success, image = comm.camera_image([0])

# Check that the image exists
print(image[0].shape)
Key Concepts
Simulations in VirtualHome work through three components: agents, representing human avatars that will perform actions; environments, representing different apartments with objects that agents can interact with and programs, that define how agents interact with the environment.
Agents
An agent is a humanoid avatar that can interact with the environment and perform actions. Agents in VirtualHome have a NavMeshAgent component, that allows them to navigate throughout the environment using shortest-parth planning, avoid obstacles and turning smoothly. They also have inverse kinematics through RootMotion FinalIK <http://root-motion.com/>, to provide realistic animations when interacting with objects. You can add multiple agents on each simulation, interacting at the same time.
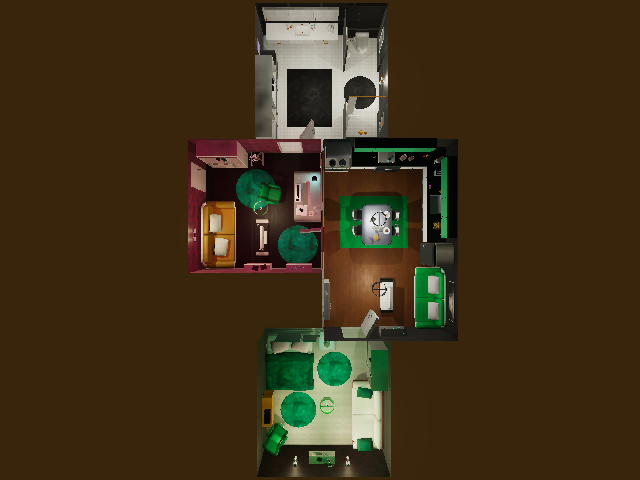
Environments
VirtualHome is composed of 7 different environments where agents can interact. Each environment represents an indoor apartment featuring different rooms and populated with different interactive objects. While the 7 environments are fixed, you can programatically add, remove or modify objects in them, providing different scenes to generate diverse videos or train your agents.
Objects
The environment is populated with 3D objects for agents to interact with. There are three classes of objects:
Static: that agents can touch and navigate to, but not change
Interactable: that agents can change their state by interacting with them (open a cabinet, turn on he stove)
Grabbable: that agents can pick and place.
EnvironmentGraph
The environments in VirtualHome is represented by an EnvironmentGraph. A graph where every node represents an object in the environment and edges represent spatial relationships.
The nodes contain the object names, a numerical identifier to interact with them, their coordinates and object bounds, as well as their state. The graph can be used to query the state of the environment, but also to modify the environment before executing anything.
Programs
Activities in VirtualHome are represented via Programs. A program is a sequence of instructions of the form:
<char_id> [action] <object> (object_id)
Where char_id corresponds to the id of the agent we want to perform the action and object_id is used to indentify the object instance to interact with, if there are more objects of a given class. VirtualHome is stateful while executing programs, meaning that if you exeute one program after another, the environment state in the second call will depend on what agents did in the first program.
An example of a program could be:
program = ['<char0> [walk] <chair> (1)', '<char0> [sit] <chair> (1)']
Agents can also execute multiple instructions at the same time, you just need to add in each instruction all the actions and agents you want to interact, separated by |. For instance.
program = ['<char0> [walk] <chair> (1) | <char1> [walk] <kitchen> (1)',
           '<char0> [sit] <chair> (1)'
Quickstart
We will show here how to get started with the simulator, and some of things you can do with it.
We recommend looking at the notebook that we provide in the Python API repository for a more complete overview.
Installation
Follow the instructions in Installation to install the environment, and make sure you can run it.
Setting up a environment
We will start by starting a communication with VirtualHome and setting up the environment. For that, create a UnityCommunication object, and reset the environment.
# cd into virtualhome repo
from simulation.unity_simulator import comm_unity

YOUR_FILE_NAME = "" # Your path to the simulator
port= "8080" # or your preferred port

comm = comm_unity.UnityCommunication(
    file_name=YOUR_FILE_NAME,
    port=port
)

env_id = 0 # env_id ranges from 0 to 6
comm.reset(env_id)
Visualizing the environment
We will now be visualizing the environment. Each environment has a set of cameras that we can use to visualize. We will select a few and take screenshots from there.
# Check the number of cameras
s, cam_count = comm.camera_count()
s, images = comm.camera_image([0, cam_count-1])
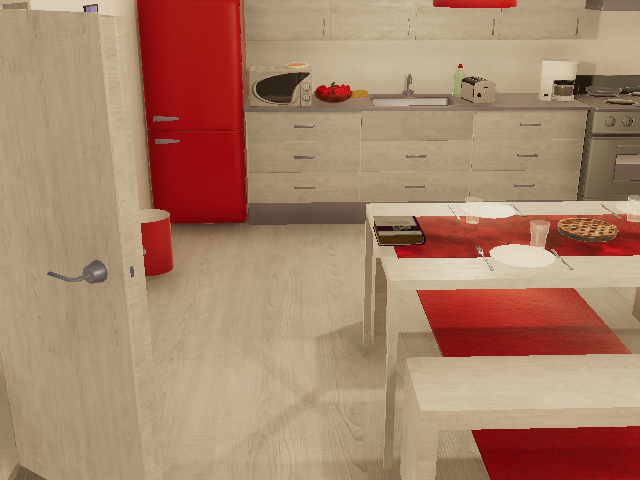
This will create two images, stored as a list in images. The last corresponds to an overall view of the apartment
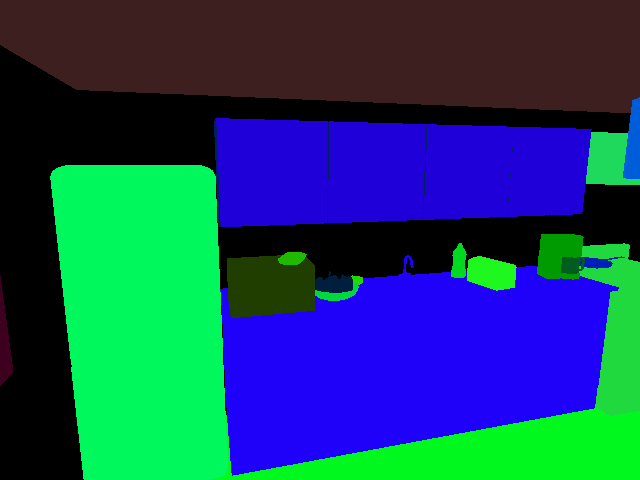
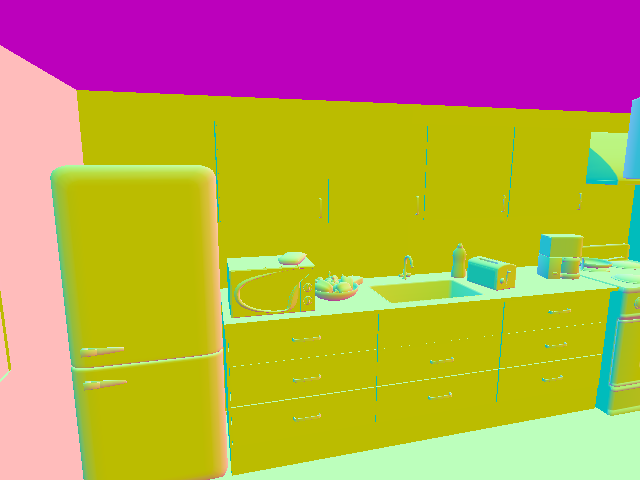
You can also add new cameras in the apartment, and visualize multiple modalities of those cameras
# Add a camera at the specified rotation and position
comm.add_camera(position=[-3, 2, -5], rotation=[10, 15, 0])

# View camera from different modes
modes = ['normal', 'seg_class', 'surf_normals']
images = []
for mode in modes:
    s, im = comm.camera_image([cam_count], mode=mode)
    images.append(im[0])
The content of images will be

Querying the scene
We will see here how to get information about the environment beyond images. Environments in VirtualHome are represented as graphs. Let’s start by querying the graph of the current scene.
# Reset the environment
comm.reset()

# Get graph
s, graph = comm.environment_graph()
Here, graph is a python dictionary, containing nodes and edges. The nodes contain a list of all the objects in the environment, each represented by a dictionary with an id to identify the object, class_name with the name of the object, and information about the object states, 3D information etc. The edges contains a list of edges representing spatial relationships between the objects.
Modifying the environment
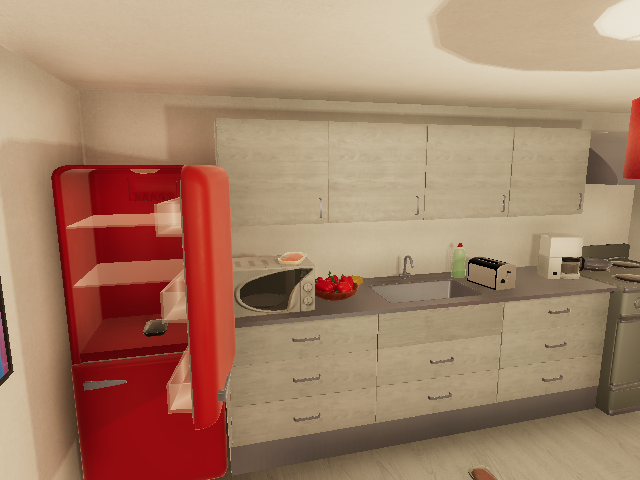
You can use the graph to modify the environment. This will allow to generate more diverse videos, or environments to train your agents. Let’s try here to place some object inside the fridge, and open it.
# Get the fridge node
fridge_node = [node for node in graph['nodes'] if node['class_name'] == 'fridge'][0]

# Open it
fridge_node['states'] = ['OPEN']

# create a new node
new_node = {
    'id': 1000,
    'class_name': 'salmon',
    'states': []
}
# Add an edge
new_edge = {'from_id': 1000, 'to_id': fridge_node['id'], 'relation_type': 'INSIDE'}
graph['nodes'].append(new_node)
graph['edges'].append(new_edge)

# update the environment
comm.expand_scene(graph)
If you take an image from the same camera as before, the environment should look like this:
Generating Videos
So far we have been setting up an environment without agents. Let’s start adding agents and generate videos with activities.
# Reset the environment
comm.reset(0)
comm.add_character('Chars/Female2')

# Get nodes for salmon and microwave
salmon_id = [node['id'] for node in g['nodes'] if node['class_name'] == 'salmon'][0]
microwave_id = [node['id'] for node in g['nodes'] if node['class_name'] == 'microwave'][0]

# Put salmon in microwave
script = [
    '<char0> [walk] <salmon> ({})'.format(salmon_id),
    '<char0> [grab] <salmon> ({})'.format(salmon_id),
    '<char0> [open] <microwave> ({})'.format(microwave_id),
    '<char0> [putin] <salmon> ({}) <microwave> ({})'.format(salmon_id, microwave_id),
    '<char0> [close] <microwave> ({})'.format(microwave_id)
]
comm.render_script(script, recording=True, frame_rate=10)<Paste>
This should have generated the following video:
We can also change the camera we are recording with, or record from multiple cameras using camera_mode argument, in render_script.
Multiagent Videos
We can also generate videos with multiple agents in them. A video will be generated for every agent
# Reset the environment
comm.reset(0)

# Add two agents this time
comm.add_character('Chars/Male2', initial_room='kitchen')
comm.add_character('Chars/Female4', initial_room='bedroom')

# Get nodes for salmon and microwave, glass, faucet and sink
salmon_id = [node['id'] for node in g['nodes'] if node['class_name'] == 'salmon'][0]
microwave_id = [node['id'] for node in g['nodes'] if node['class_name'] == 'microwave'][0]
glass_id = [node['id'] for node in g['nodes'] if node['class_name'] == 'waterglass'][-1]
sink_id = [node['id'] for node in g['nodes'] if node['class_name'] == 'sink'][0]
faucet_id = [node['id'] for node in g['nodes'] if node['class_name'] == 'faucet'][-1]


# Put salmon in microwave
script = [
     '<char0> [walk] <salmon> ({}) | <char1> [walk] <glass> ({})'.format(salmon_id, glass_id),
     '<char0> [grab] <salmon> ({}) | <char1> [grab] <glass> ({})'.format(salmon_id, glass_id),
     '<char0> [open] <microwave> ({}) | <char1> [walk] <sink> ({})'.format(microwave_id, sink_id),
     '<char0> [putin] <salmon> ({}) <microwave> ({}) | <char1> [putback] <glass> ({}) <sink> ({})'.format(salmon_id, microwave_id, glass_id, sink_id),
     '<char0> [close] <microwave> ({}) | <char1> [switchon] <faucet> ({})'.format(microwave_id, faucet_id)
]
comm.render_script(script, recording=True, frame_rate=10, camera_mode=["PERSON_FROM_BACK"])
The previous command will generate frames corresponding to the following video
Interactive Agents
So far we have seen how to generate videos, but we can use the same command to deploy or train agents in the environment. You can execute the previous instructions one by one, and get an observation or graph at every step. or that, you don’t need to generate videos or have animations, since it will slow down your agents. Use skip_animation=True to generate actions without animating them. Remember to turn off the recording mode as well.
# Reset the environment
comm.reset(0)

# Add two agents this time
comm.add_character('Chars/Male2', initial_room='kitchen')
comm.add_character('Chars/Female4', initial_room='bedroom')

# Get nodes for salmon and microwave, glass, faucet and sink
salmon_id = [node['id'] for node in g['nodes'] if node['class_name'] == 'salmon'][0]
microwave_id = [node['id'] for node in g['nodes'] if node['class_name'] == 'microwave'][0]
glass_id = [node['id'] for node in g['nodes'] if node['class_name'] == 'waterglass'][-1]
sink_id = [node['id'] for node in g['nodes'] if node['class_name'] == 'sink'][0]
faucet_id = [node['id'] for node in g['nodes'] if node['class_name'] == 'faucet'][-1]


# Put salmon in microwave
script = [
   '<char0> [walk] <salmon> ({}) | <char1> [walk] <glass> ({})'.format(salmon_id, glass_id),
   '<char0> [grab] <salmon> ({}) | <char1> [grab] <glass> ({})'.format(salmon_id, glass_id),
   '<char0> [open] <microwave> ({}) | <char1> [walk] <sink> ({})'.format(microwave_id, sink_id),
   '<char0> [putin] <salmon> ({}) <microwave> ({}) | <char1> [putback] <glass> ({}) <sink> ({})'.format(salmon_id, microwave_id, glass_id, sink_id),
   '<char0> [close] <microwave> ({}) | <char1> [switchon] <faucet> ({})'.format(microwave_id, faucet_id)
]

s, cc = comm.camera_count()
for script_instruction in script:
    comm.render_script([script_instruction], recording=False, skip_animation=True)
    # Here you can get an observation, for instance
    s, im = comm.camera_image([cc-3])<Paste>